Photo by Chris Ried on Unsplash
How to create a TextEditor in React using ReactQuill
React, ReactQuill
React is a powerful tool for front-end development. Create a component once and it's there to be reused wherever you need.
Let's dive deep into the process...
React-Quill
It is a potent tool for implementing a text editor in React with almost all features found in any offline text editor. The text written in this editor stores data in JSX format, which can easily be rendered later.
The Flow
Create three files namely Toolbar.js, Editor.js, DisplayText.js, and style.css
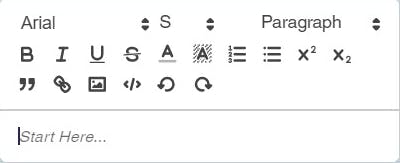
The toolbar and editor will work as the whole text editor.
DisplayText will work as a display component for the edited text.
style.css will help in adding custom features.
Implementation
For our purpose, we need to install React-Quill first
npm install react-quill or yarn add react-quill
Toolbar.js
Import files
import React from "react";
import { Quill } from "react-quill";
import './styles.css'
Create modules and formats
export const modules = {
    toolbar: {
        container: "#toolbar-container",
        handlers: {
            undo: undoChange,
            redo: redoChange
        }
    },
    history: {
        delay: 500,
        maxStack: 100,
        userOnly: true
    }
};
export const formats = [
    "header",
    "font",
    "size",
    "bold",
    "italic",
    "underline",
    "align",
    "strike",
    "script",
    "blockquote",
    "background",
    "list",
    "bullet",
    "indent",
    "link",
    "image",
    "color",
    "code-block"
];
Don't worry about the implementation here. It will get easier when we dive deep down into the whole code. For now, realize that modules and formats are sent as props to the ReactQuill component. It allows us to focus on what features to render in the text-editor. At end, I will try to summarize all the code using comments.
Now, use JSX to create toolbar components. Set the ID to "toolbar-container". It will connect this JSX to the container inside toolbar modules definition.
export const Toolbar = () => (
    <div id="toolbar-container">
        <span className="ql-formats" style={{ marhinBottom: "10vh" }}>
            <div className="w3-row">
                <div className="w3-col l4">
                    <select className="ql-font" defaultValue="arial" style={{ width: "16vh" }}>
                        <option value="inconsolata">Inconsolata</option>
                        <option value="roboto">Roboto</option>
                        <option value="mirza">Mirza</option>
                        <option value="arial">Arial</option>
                    </select>
                </div>
                <div className="w3-col l4">
                    <select className="ql-size" defaultValue="small" style={{ marginLeft:"2vh",width: "8vh" }}>
                        <option value="extra-small">ES</option>
                        <option value="small">S</option>
                        <option value="medium">M</option>
                        <option value="large1">L</option>
                        <option value="extra-large">XL</option>
                    </select>
                </div>
                <div className="w3-col l4">
                    <select className="ql-header" defaultValue="3" style={{ width: "15vh" }}>
                        <option value="1">Heading</option>
                        <option value="2">Subheading</option>
                        <option value="3">Paragraph</option>
                    </select>
                </div>
            </div>
        </span>
        <span className="ql-formats">
            <button className="ql-bold" />
            <button className="ql-italic" />
            <button className="ql-underline" />
            <button className="ql-strike" />
            <select className="ql-color" />
            <select className="ql-background" />
            <button className="ql-list" value="ordered" />
            <button className="ql-list" value="bullet" />
            <button className="ql-script" value="super" />
            <button className="ql-script" value="sub" />
        </span>
        <span className="ql-formats">
            <button className="ql-blockquote" />
            <button className="ql-link" />
            <button className="ql-image" />
            <button className="ql-code-block" />
            <button className="ql-undo">
                <CustomUndo />
            </button>
            <button className="ql-redo">
                <CustomRedo />
            </button>
        </span>
    </div>
);

export default Toolbar;
Now our modules, formats, and toolbar components are created. But wait a minute, we have used <CustomUndo /> the component. What is it? It is just a custom code to add Undo feature and the same is <CustomRedo /> . They are defined as
const CustomUndo = () => (
    <svg viewBox="0 0 18 18">
        <polygon className="ql-fill ql-stroke" points="6 10 4 12 2 10 6 10" />
        <path
            className="ql-stroke"
            d="M8.09,13.91A4.6,4.6,0,0,0,9,14,5,5,0,1,0,4,9"
        />
    </svg>
);

const CustomRedo = () => (
    <svg viewBox="0 0 18 18">
        <polygon className="ql-fill ql-stroke" points="12 10 14 12 16 10 12 10" />
        <path
            className="ql-stroke"
            d="M9.91,13.91A4.6,4.6,0,0,1,9,14a5,5,0,1,1,5-5"
        />
    </svg>
);

function undoChange() {
    this.quill.history.undo();
}
function redoChange() {
    this.quill.history.redo();
}
To make things like fonts and sizes work, we need to register them first
const Font = Quill.import("formats/font");
Font.whitelist = ["inconsolata","roboto","mirza","arial"];
Quill.register(Font, true);

const Size = Quill.import("formats/size");
Size.whitelist = ["extra-small", "small", "medium", "large1", "extra-large"];
Quill.register(Size, true);
We are done with the toolbar.js now.
Editor.js
Create an editor component like this.
import React, { useState } from "react";
import ReactQuill from 'react-quill'
import DisplayText from "./DisplayTextQuill";
import Toolbar, { modules, formats} from "./ToolBar";
import 'quill/dist/quill.snow.css'
import "react-quill/dist/quill.core.css";
import './styles.css';

const Editor = (props) => {
    const [state, setState] = React.useState({ value: null });
    const handleChange = (value) => {
        setState({ value });
        props.setData(value)
    };
    return (
        <div className="w3-card">
          <QuillToolbar />
          <ReactQuill
            theme="snow"
            value={state.value}
            onChange={handleChange}
            placeholder={"Start Here..."}
            modules={modules}
            formats={formats}
          />
          <DisplayText data = {state.value}/>
        </div>
      );

}
export default Editor;
DisplayText.js
import React from "react";
import ReactQuill from 'react-quill'
import './styles.css'

const DisplayText = (props) => {
    const jsxString = props.data;
    return (
        <div>
            <div dangerouslySetInnerHTML={{ __html: jsxString }} />
        </div>
    );
}
export default DisplayText;
Styles.css
@import url('https://fonts.googleapis.com/css2?family=Lato:wght@400;700&family=Abhaya+Libre&family=Merriweather&family=Alegreya&family=Montserrat&family=Aleo&family=Muli&family=Arapey&family=Nunito&family=Asap+Condensed&family=Assistant&family=Open+Sans&family=Barlow&family=Oswald&family=Bitter&family=Poppins&family=Brawler&family=Roboto&family=Caladea&family=Rokkitt&family=Carme&family=Rubik&family=Raleway&family=Helvetica&family=Quicksand&family=Pacifico&family=Abril+Fatface&family=Dosis&family=Inconsolata&family=Roboto&family=Mirza&family=Arial&display=swap');

#toolbar-container .ql-font span[data-label="Inconsolata"]::before {
    font-family: "Inconsolata";
  }
#toolbar-container .ql-font span[data-label="Roboto"]::before {
    font-family: "Roboto";
  }
#toolbar-container .ql-font span[data-label="Mirza"]::before {
    font-family: "Mirza";
  }
#toolbar-container .ql-font span[data-label="Arial"]::before {
    font-family: "Arial";
  }
.ql-font-inconsolata {
    font-family: "Inconsolata";
  }

.ql-font-roboto {
    font-family: "Roboto";
  }

.ql-font-mirza {
    font-family: "Mirza";
  }

.ql-font-arial {
    font-family: "Arial";
  }

.ql-size-extra-small {
    font-size: 0.5rem;
}

.ql-size-small {
    font-size: 1rem;
}

.ql-size-medium {
    font-size: 1.5rem;
}

.ql-size-large1 {
    font-size: 2.5rem;
}

.ql-size-extra-large {
    font-size: 3rem;
}
Now hands away from the keyboard.
We are done.
Result
In Editor.js, the state.value will store JSX. One can render them anywhere provides styles.css is applied there.
Thanks.
Have a nice day ;)

